Scenario Replication TimeInSystem
0 1 1.0 0.443924
1 1 2.0 0.521371
2 1 3.0 0.441290
3 1 4.0 0.418234
4 1 5.0 0.519311
Mean 0.449299
CI Half Width 0.007243
Name: TimeInSystem, dtype: float647 Radiology Clinic
In this lab you will be introduced to the basics of creating a simulation model using the discrete event simulation software Jaamsim and the HCCM module. To do this we will use the CT service of a radiology clinic as an example. At the clinic patients: arrive according to a known distribution 24/7; check in at reception, which takes a uniformly distributed amount of time; and then have a scan, the duration of which also follows a known distribution; and finally leave.
We want to use the simulation to determine the average time that patients spend in the clinic, between arriving and leaving. We want to compare this time to the time that patients would spend in the system if interarrival times and scan durations were always equal to the average of the distributions for all patients. Typically we would first formulate the simulation model by defining the objectives, benefits, conceptual model, and experiments. For the sake of brevity we will only cover the experiments. As the aim of the lab is to learn the basics of Jaamsim, the conceptual model is not given here, instead it is available in Chapter 13.
To have your lab signed off you need to show that you have built the simulation model, can run it, and the output matches the provided results.
7.1 Experiments
We will perform just one experiment, using distributions for the arrival, check in, and scan processes. We will use a Poisson distribution with \(\lambda=8/\text{hour}\) for the arrival process, a uniform distribution between 2 and 5 minutes for the check in durations, and a log-normal distribution where the underlying normal variable has a mean of -1.34 and standard deviation 0.29 for the scan durations. For the experiment we will run 50 replications that each last for 1 week.
7.2 Jaamsim Model
7.2.1 Creating Model Objects
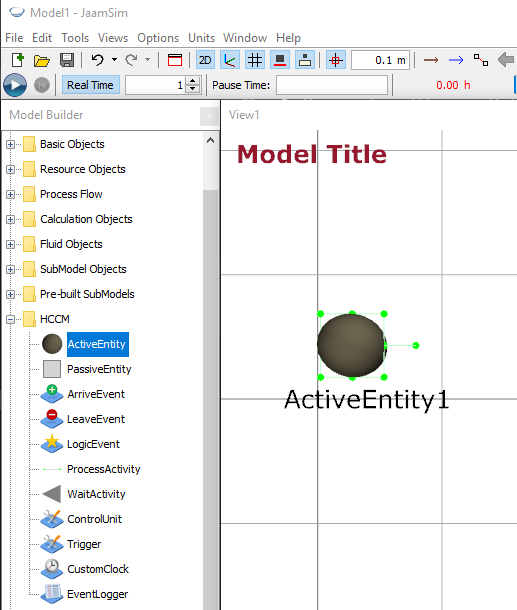
Run Jaamsim by opening your VSCode project and the clicking the run button and select GUIFrame. The HCCM palette on the left hand side allows us to create Jaamsim objects that correspond to the components of our HCCM conceptual models. Based on the problem description and conceptual model we need three types of entities: patients, receptionists, and CT Machines. To create each of these expand the HCCM palette in the Model Builder window, select ActiveEntity, and dragging it into the View Window, see Figure 7.1. Then in the Object Selector window select ActiveEntity1, press F2, and rename it PatientEntity. Alternatively, you can change the name by editing the value of the ‘Name’ Keyword, which is the top entry in the ‘Key Inputs’ tab.
Repeat this process two more times and create ActiveEntities called ReceptionistEntity and CTMachineEntity.
An ActiveEntity object by itself does not create any entities in the simulation, it just acts as a prototype for entities. To create entities an ArriveEvent object is used, which simulates patients/receptionists/CTMachines arriving at the clinic. The ArriveEvent object creates a series of entities that are passed to the next object in a process. The PrototypeEntity keyword identifies the entity to be copied. The rate at which entities are generated is determined by the InterArrivalTime and FirstArrivalTime keywords. Create three ArriveEvents called PatientArrival, ReceptionistArrival, and CTMachineArrival, and set the PrototypeEntity to be the related entity (patient, receptionist, CTMachine).
We also need to create objects that represent the entities leaving, called LeaveEvent, we will only create one for the patients, as we are assuming that the receptionist and CT machines are available 24/7 so they do not need to leave. Drag and drop a leave event into the simulation, rename it PatientLeave, and set the Participant to be the patient entity (under the HCCM tab).
The patients waiting for check in and scanning, and both the receptionist and CT machines waiting for tasks can be represented by WaitActivities, so create four WaitActivities and rename them WaitForCheckIn, WaitForScan, WaitForTaskReceptionist, and WaitForTaskCTMachine respectively, and once again set the Participant to the respective entity.
We can then represent the patient doing check in with the receptionist, and the patient being scanned by a CT machine as process activities. Create two process activities and rename them CheckIn, and Scan.
We also need to create objects to represent the probability distributions that the interarrival, check in, and scan times come from. Probability distributions can be represented in Jaamsim with distribution objects. If we examine the PatientArrival object we see two keywords FirstArrivalTime and InterArrivalTime which determine the rate that the entities are created. For a Poisson process with an average of 8 arrivals per hour the interarrival times can be modelled by an exponential distribution with mean 0.125 hours. We therefore go into the Probability Distributions palette in the Model Builder window and create an ExponentialDistribution object and name it ArrivalDistribution. First we set the UnitType keyword to be TimeUnit, then we set the mean of the distribution to 0.125 h. The UnitType tells Jaamsim what type of value we want the distribution object to create, in our case this is the time between arrivals in hours, which is a unit of time. Also make sure that the RandomSeed is 1, this determines the seed for the random number generator. Table 7.1 shows the keywords and values for the ArrivalDistribution object.
| Object | Keyword | Value |
|---|---|---|
| ArrivalDistribution | UnitType | TimeUnit |
| RandomSeed | 1 | |
| Mean | 0.125 h |
We need to repeat these steps for the check in and scan processes, which follow uniform and log-normal distributions respectively, so create a UniformDistribution object called CheckInDistribution and a LogNormalDistribution object called ScanDistribution. Then update the keywords of the distribution objects as follows in Table 7.2:
| Object | Keyword | Value |
|---|---|---|
| CheckInDistribtuion | UnitType | TimeUnit |
| RandomSeed | 2 | |
| MinValue | 2 min | |
| MaxValue | 5 min | |
| ScanDistribution | UnitType | TimeUnit |
| RandomSeed | 3 | |
| Scale | 1 h | |
| NormalMean | -1.34 | |
| NormalSD | 0.29 |
The final object we need at this stage is a Statistics object, to capture some output about the patients. This is found under the ProcessFlow palette, create a Statistics object and call it TimeInSystem.
At this point you should have the objects shown in Table 7.3 in your simulation.
| Object Type | Name |
|---|---|
| ActiveEntity | PatientEntity |
| ActiveEntity | ReceptionistEntity |
| ActiveEntity | CTMachineEntity |
| ArriveEvent | PatientArrival |
| ArriveEvent | ReceptionistArrival |
| ArriveEvent | CTMachineArrival |
| LeaveEvent | PatientLeave |
| WaitActivity | WaitForCheckIn |
| WaitActivity | WaitForScan |
| WaitActivity | WaitForTaskReceptionist |
| WaitActivity | WaitForTaskCTMachine |
| ProcessActivity | CheckIn |
| ProcessActivity | Scan |
| ExponentialDistribution | ArrivalDistribution |
| UniformDistribution | CheckInDistribution |
| LogNormalDistribution | ScanDistribution |
| Statistics | TimeInSystem |
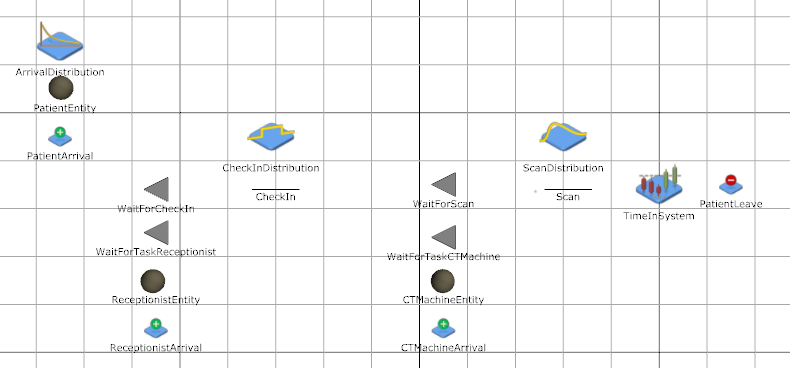
Once you have created all of these objects lay them out similarly to as shown in Figure 7.2.
Create a new folder in the labs folder called RC1 and save your simulation as radiology_lab.cfg or something similar inside the new folder. Also take this opportunity to change the graphics of the PatientEntity, ReceptionistEntity and CTMachineEntity. Download the patient.png, receptionist.png, and ctscanner.png (icons made by Freepik from www.flaticon.com) files from Canvas in the Lab 5: Radiology Clinic Assignment and save them in the same folder as your simulation .cfg file. Then in Jaamsim right click on PatientEntity and select Change Graphics. Click on Import and navigate to your downloaded patient.png, import it (it may be called patient-model) and accept the change. Repeat the process for the receptionists, and CT scanners.
7.2.2 Configuring Objects
Now that we have created the objects we need, we need to set the options for the each of them, starting with the ArriveEvents. The PatientArrival should have both the first arrival time and inter arrival times set by the ArrivalDistribution object, use the PatientEntity as a prototype, and the NextAEJObject should be WaitForCheckIn. NextAEJObject stands for next activity/event/Jaamsim object and refers to the fact that the next place an entity goes could be a standard Jaamsim object or a custom HCCM activity or event. For the arrive events we set NextAEJObject to the object that represents the activity that is transitioned to at the end of the event state changes in the conceptual model. For the ReceptionistArrival and CTMachineArrival we need to: set the prototype entity; both MaxNumber and InitialNumber (1 for receptionist, 3 for CT Machine); and set the NextAEJObject to the respective wait activity.
| Object | Tab | Keyword | Value |
|---|---|---|---|
| PatientArrival | Key Inputs | PrototypeEntity | PatientEntity |
| PatientArrival | Key Inputs | FirstArrivalTime | ArrivalDistribution |
| PatientArrival | Key Inputs | InterArrivalTime | ArrivalDistribution |
| PatientArrival | HCCM | NextAEJObject | WaitForCheckIn |
| ReceptionistArrival | Key Inputs | PrototypeEntity | ReceptionistEntity |
| ReceptionistArrival | Key Inputs | MaxNumber | 1 |
| ReceptionistArrival | Key Inputs | InitialNumber | 1 |
| ReceptionistArrival | HCCM | NextAEJObject | WaitForTaskReceptionist |
| CTMachineArrival | Key Inputs | PrototypeEntity | CTMachineEntity |
| CTMachineArrival | Key Inputs | MaxNumber | 3 |
| CTMachineArrival | Key Inputs | InitialNumber | 3 |
| CTMachineArrival | HCCM | NextAEJObject | WaitForTaskCTMachine |
Next we will set the options for the Process Activities (and Statistics) so that the routing/flow for the entities is correct. The Check In activity has both the Patient and Receptionist as participants so we set the Participant list to PatientEntity, ReceptionistEntity. The duration is determined by the check in distribution, so we just set the duration to be CheckInDistribution object. After Check In the Patient starts waiting for a scan and the receptionist goes back to waiting for a task, so we set the NextAEJList to WaitForScan, WaitForTaskReceptionist. The Scan activity has both the Patient and CTMachine as participants and the duration is determined by the ScanDistribution object. After Scan the Patient should just leave, but we want to record some statistics first so we send it to TimeInSystem, and the CTMachine goes back to WaitForTaskCTMachine. For Process Activities the NextAEJList is similar to the NextAEJObject from the Arrive Events (which is similar to NextComponent), the difference is that a list of next objects is given, one for each of the participants in the activity. The participants are sent to the corresponding element of the list so it is important that the next activities are in the same order as the participants.
Note that when you click on the checkboxes in the popup menu for both ParticipantList and NextAEJList the items are added in alphabetical order, not the order you click them in. This is particularly important for the Scan activity as the CTMachineEntity comes before the PatientEntity alphabetically, but for the next activities TimeInSystem is before WaitForTaskCTMachine alphabetically so the two lists will not be in the same order.
| Object | Tab | Keyword | Value |
|---|---|---|---|
| CheckIn | Key Inputs | Duration | CheckInDistribution |
| CheckIn | HCCM | ParticipantList | PatientEntity ReceptionistEntity |
| CheckIn | HCCM | NextAEJList | WaitForScan WaitForTaskReceptionist |
| Scan | Key Inputs | Duration | ScanDistribution |
| Scan | HCCM | ParticipantList | PatientEntity CTMachineEntity |
| Scan | HCCM | NextAEJList | TimeInSystem WaitForTaskCTMachine |
The last object we need to configure before the simulation will run (it will run but it will not quite work correctly) is the TimeInSystem object. This is a Statistics object which collects a value from each Entity that passes through it and outputs the mean of the sampled values. We then need to finish the routing so that patients leave after going through the TimeInSystem, and tell the Statistics object which value to record as shown in Table 8.7, note that this refers to the Statistics object itself, obj refers to the entity that the Statistics object is currently processing, and TotalTime is an output on the entity that stores the total time that the entity has been in the simulation for.
| Object | Keyword | Value |
|---|---|---|
| TimeInSystem | NextComponent | PatientLeave |
| UnitType | TimeUnit | |
| SampleValue | this.obj.TotalTime |
Save your simulation again. If you run your simulation now you should see one receptionist arrive and wait, three CT machines arrive and wait, and patients arrive, and wait for check in. However nothing else will happen and all of the entities will simply be waiting, this is because we have not specified any logic to be triggered when the entities start waiting.
7.3 Model Logic – Java
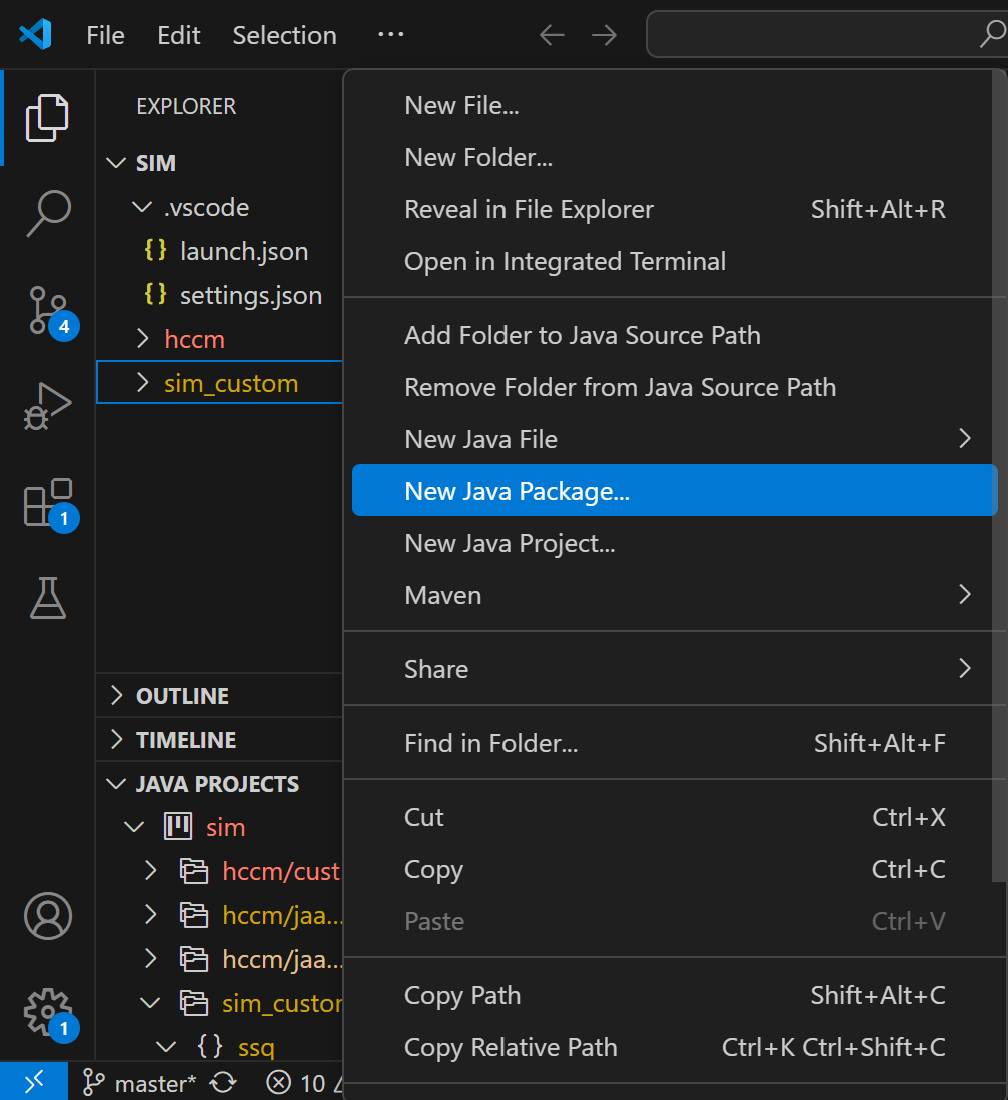
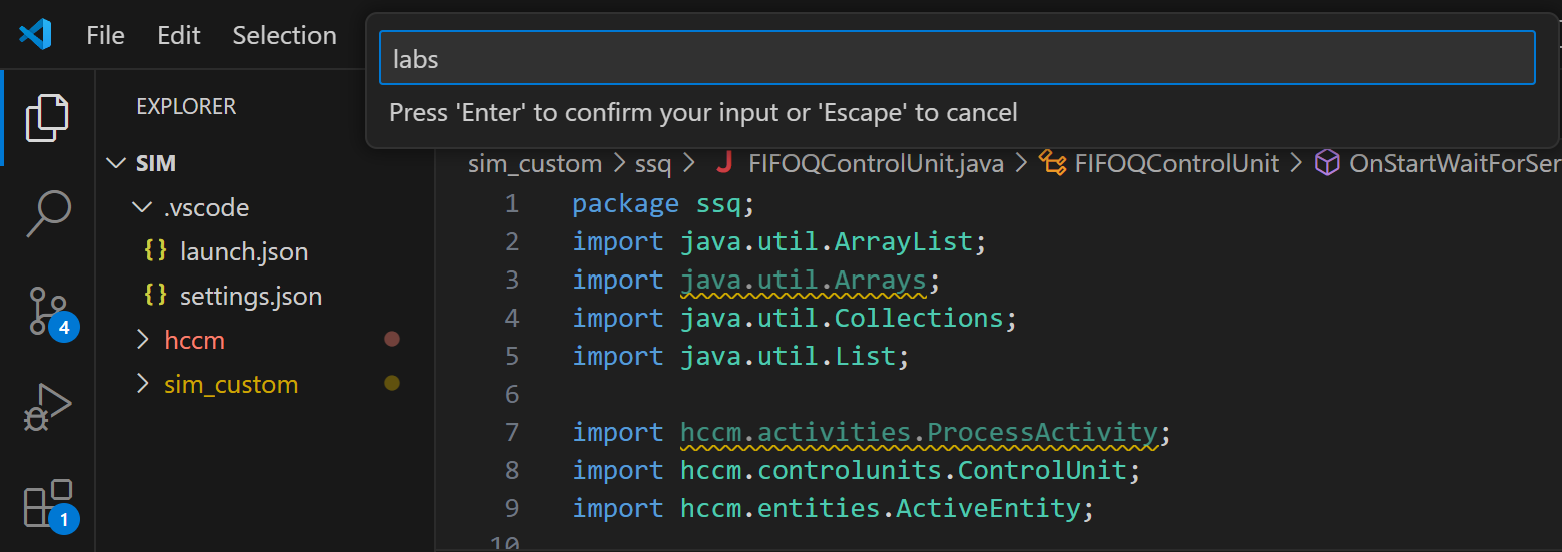
In your VSCode project you should have a folder called sim_custom under the Explorer tab on the left-hand side in VSCode. First right-click on this folder and select New Java Package. Enter labs for the name of the package and press Enter.
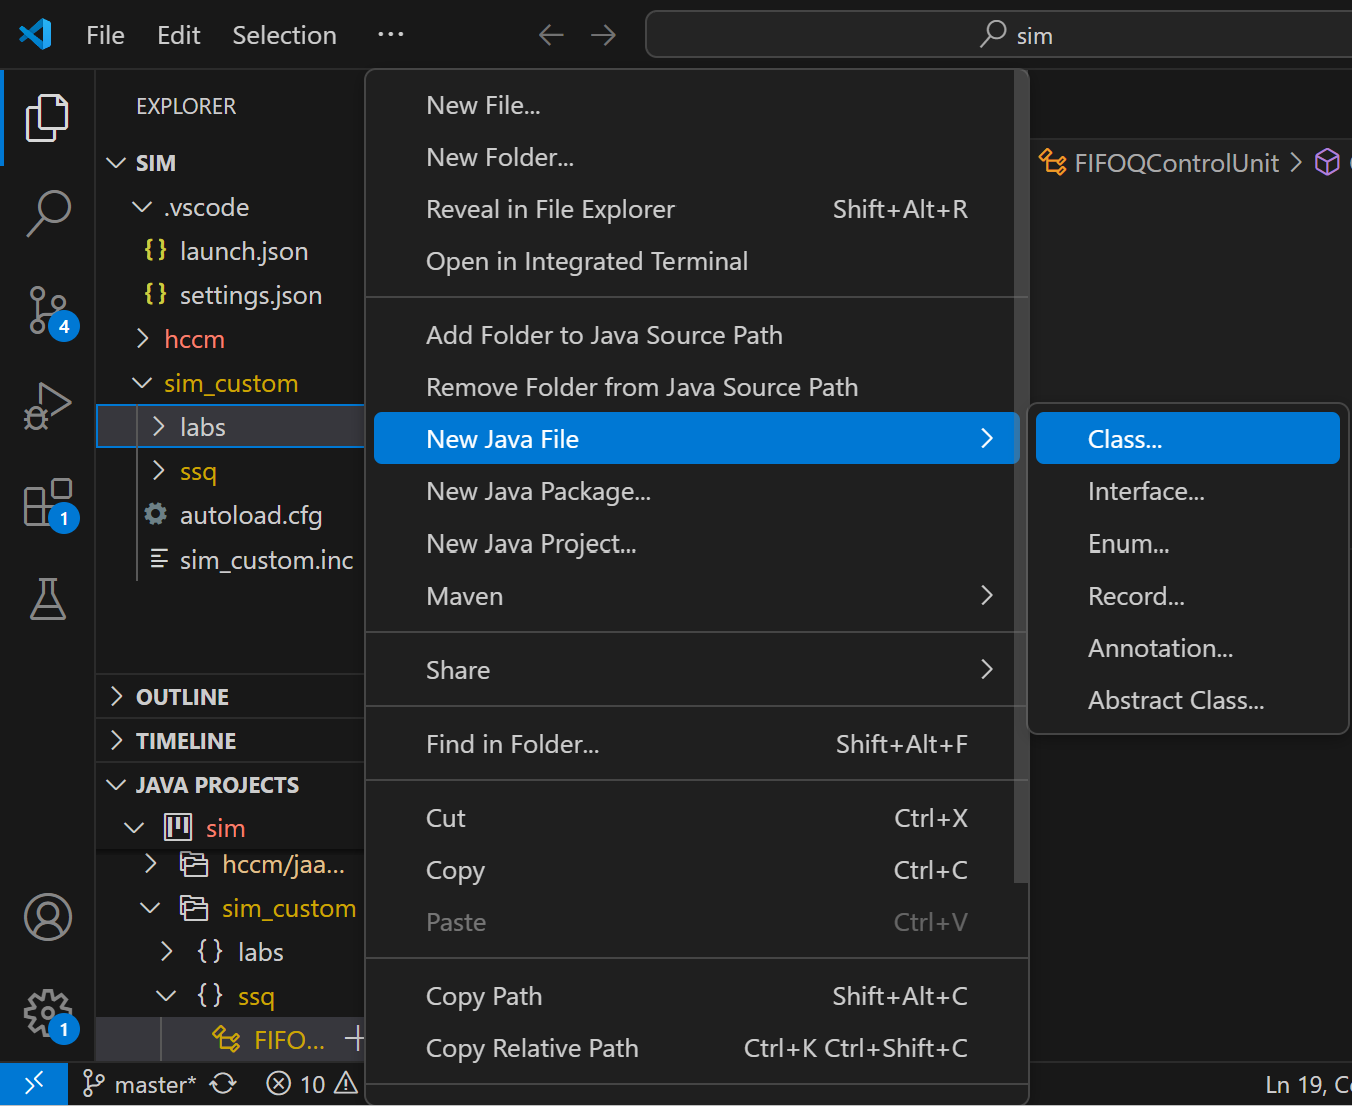
A new folder called labs should have been created within the sim_custom folder. Right click on the newly created labs folder and select New Java File \(\rightarrow\) Class. Name the Class RadiologyControlUnit and press Enter.
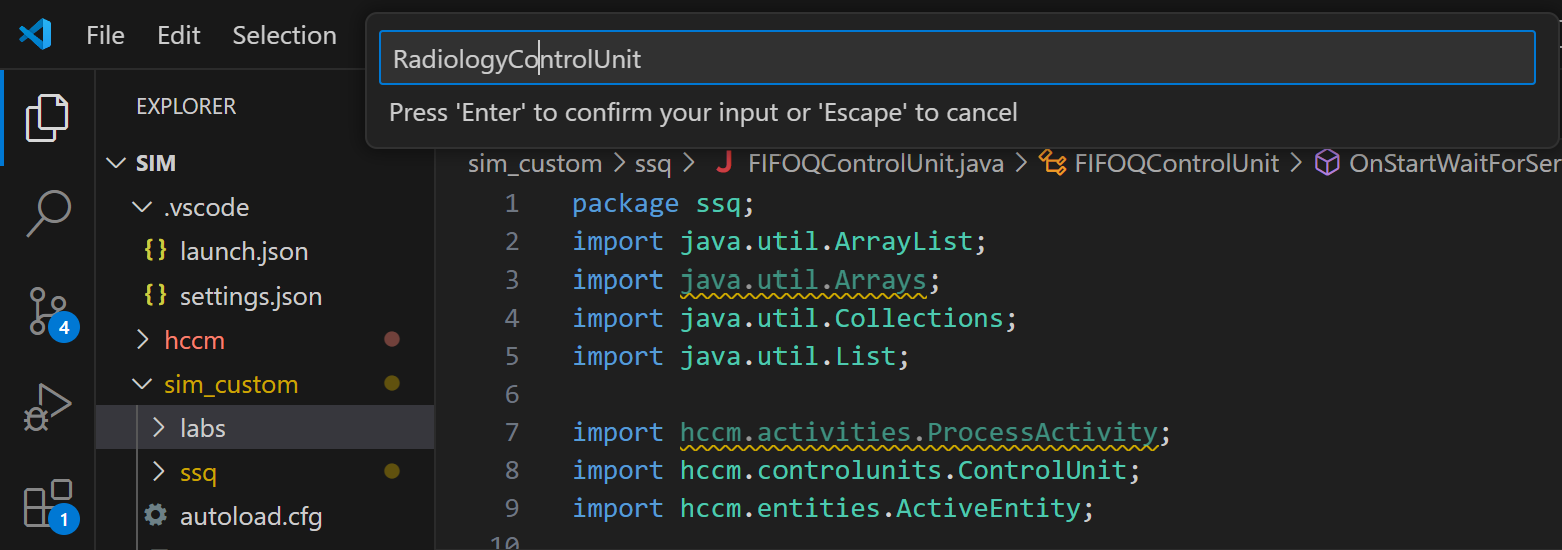
Once you have created the new class, an almost-empty file called RadiologyControlUnit.java should be created. You need to add extends ControlUnit to the line that declares the class, and also import the ControlUnit class with import hccm.controlunits.ControlUnit;. At this stage the file should look like this:
The final step required to make this new object available in the simulation is to add to the contents of the sim_custom.inc file that we put in sim \(\rightarrow\) hccm \(\rightarrow\) jaamsim \(\rightarrow\) src \(\rightarrow\) main \(\rightarrow\) resources \(\rightarrow\) resources \(\rightarrow\) inputs. There should already be some code there from the previous lab, so you only need to add lines 3, 7, and 10. If you want to copy and paste this make sure the quotes are copied correctly and the returns (arrows) are removed. Alternatively there is a new sim_custom.inc file here on Canvas in the Lab 5: Radiology Clinic Assignment that you can use directly.
Define ObjectType {
    FIFOQControlUnit
    RadiologyControlUnit
}

ControllerIconModel ImageFile { '<res>/images/Controller-256.png' }  Transparent { TRUE }
AssembleIconModel ImageFile { '<res>/images/Assemble-256.png' }  Transparent { TRUE }

FIFOQControlUnit JavaClass { ssq.FIFOQControlUnit }  Palette { 'Single Server Queue' } DefaultDisplayModel { ControllerIconModel } IconFile { '<res>/images/Controller-24.png' } DefaultSize { 0.5 0.5 0.5 m }
RadiologyControlUnit JavaClass { labs.RadiologyControlUnit }  Palette { 'Custom Logic' } DefaultDisplayModel { AssembleIconModel } IconFile { '<res>/images/Assemble-24.png' } DefaultSize { 0.5 0.5 0.5 m }
Once you have updated the sim_custom.inc file, restart Jaamsim. If everything is working correctly the RadiologyControlUnit object should now be available under the Custom Logic palette as shown in the screenshot below:
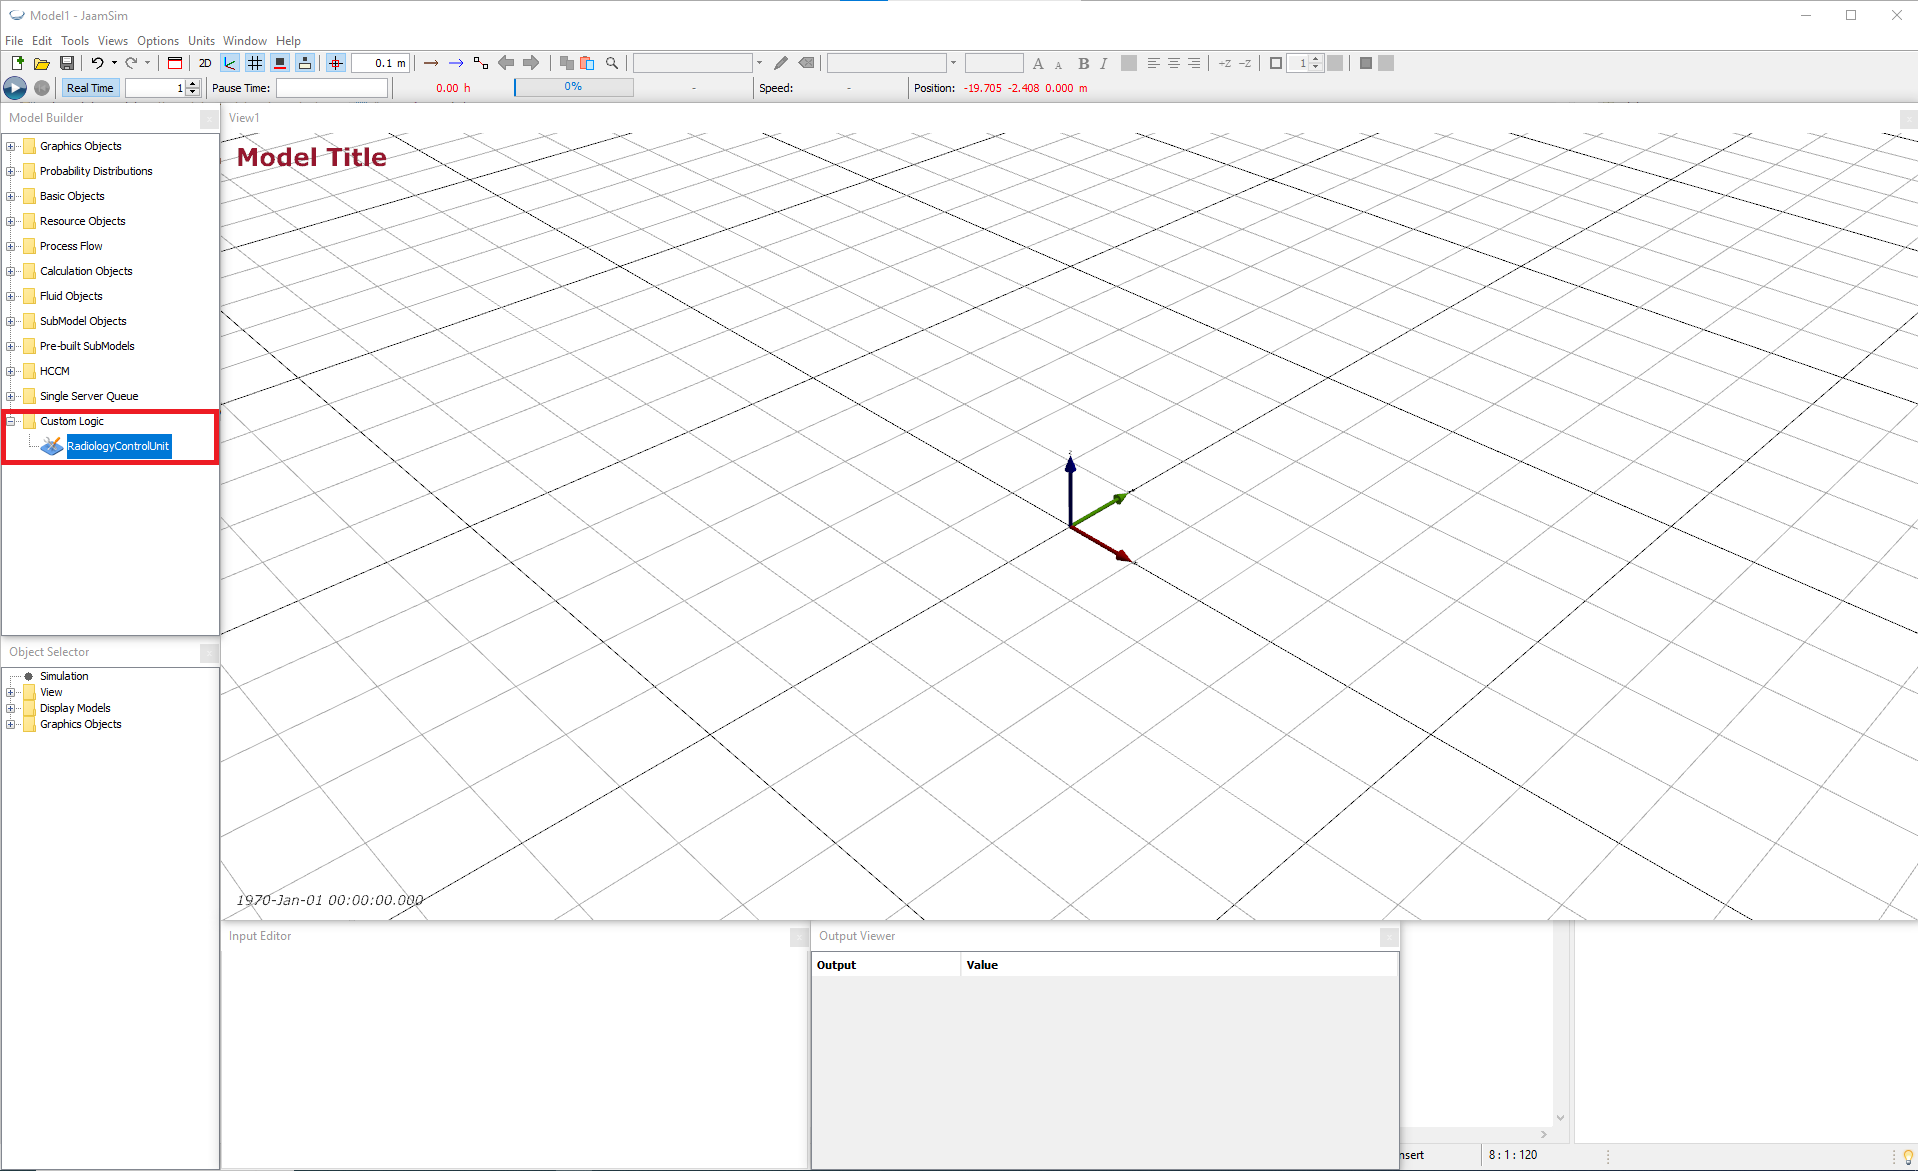
Once you have the new RadiologyControlUnit object available open your simulation and create one.
We now need to add the Java code to the new RadiologyControlUnit class to run the control policies. First add the following imports under the package declaration. Note These code snippets for this lab are provided in a separate file for you here on Canvas in the Lab 5: Radiology Clinic Assignment.
Then, within the definition of the class we need to create four methods that represent the four control policies in the model. Each control policy is a public method of the class that does not return any value (is void) and takes both a list of Active Entities, and the simulation time as inputs. We will use the same names for the methods as the control policies in the conceptual model: OnStartWaitForCheckIn, OnStartWaitForScan, OnStartWaitForTaskReceptionist, and OnStartWaitForTaskCTMachine. In the first of these, OnStartWaitForCheckIn we first need to get a list of the Receptionist Entities that are currently in the ’’WaitForTaskReceptionist” activity, and we also create a comparator object that is used to sort a list of entities by when they started their current activity.
Once we have the list of idle receptionists we check whether it is not empty, and if it isn’t proceed to sort it, select the first one, and transition the patient and receptionist to the check in activity.
public void OnStartWaitForCheckIn(List<ActiveEntity> ents, double simTime) {

    ArrayList<ActiveEntity> idleReceps = this.getEntitiesInActivity("ReceptionistEntity", "WaitForTaskReceptionist", simTime);
    ActivityStartCompare actSartComp = this.new ActivityStartCompare();

    if (idleReceps.size() > 0) {
      Collections.sort(idleReceps, actSartComp);

      ActiveEntity patient = ents.get(0);
      ActiveEntity receptionist = idleReceps.get(0);

      transitionTo("CheckIn", patient, receptionist);
    }
  }
Similar methods are defined for the other control policies, with small changes based on the types of entities that are being checked, and the activity that is started. There are gaps that need to be filled in on lines 3, 24, and 42. In the first gap you need to create an array that contains all of the CT Machines that are currently idle. In the second, you need to select which of the patients that are currently waiting should do check in with the receptionist. In the third, you need to start the next activity with the patient and CT Machine. All of these have similar lines in the first method that you can use as a guide.
public void OnStartWaitForScan(List<ActiveEntity> ents, double simTime) {

    // A //
    ActivityStartCompare actSartComp = this.new ActivityStartCompare();

    if (idleCTs.size() > 0) {
      Collections.sort(idleCTs, actSartComp);

      ActiveEntity patient = ents.get(0);
      ActiveEntity ct = idleCTs.get(0);

      transitionTo("Scan", patient, ct);
    }
  }

public void OnStartWaitForTaskReceptionist(List<ActiveEntity> ents, double simTime) {

  ArrayList<ActiveEntity> waitPats = this.getEntitiesInActivity("PatientEntity", "WaitForCheckIn", simTime);
  ActivityStartCompare actSartComp = this.new ActivityStartCompare();

  if (waitPats.size() > 0) {
    Collections.sort(waitPats, actSartComp);

    // B //
    ActiveEntity receptionist = ents.get(0);

    transitionTo("CheckIn", patient, receptionist);
  }
}

public void OnStartWaitForTaskCTMachine(List<ActiveEntity> ents, double simTime) {

  ArrayList<ActiveEntity> waitPats = this.getEntitiesInActivity("PatientEntity", "WaitForScan", simTime);
  ActivityStartCompare actSartComp = this.new ActivityStartCompare();

  if (waitPats.size() > 0) {
    Collections.sort(waitPats, actSartComp);

    ActiveEntity patient = waitPats.get(0);
    ActiveEntity ct = ents.get(0);

    // C //
  }
}
The final step needed to get this logic into the simulation is to define Triggers that initiate these methods and where/when they should be called. To do this create four Trigger objects, called StartWaitCheckIn, StartWaitScan, StartWaitTaskReceptionist, and StartWaitTaskCTMachine from the HCCM palette and set the ControlUnit and ControlPolicy for each one. The value of the ControlPolicy keyword needs to exactly match the name of the method you have defined in the java code.
| Object | Tab | Keyword | Value |
|---|---|---|---|
| StartWaitCheckIn | HCCM | ControlUnit | RadiologyControlUnit1 |
| StartWaitCheckIn | HCCM | ControlPolicy | OnStartWaitForCheckIn |
| StartWaitScan | HCCM | ControlUnit | RadiologyControlUnit1 |
| StartWaitScan | HCCM | ControlPolicy | OnStartWaitForScan |
| StartWaitTaskReceptionist | HCCM | ControlUnit | RadiologyControlUnit1 |
| StartWaitTaskReceptionist | HCCM | ControlPolicy | OnStartWaitForTaskReceptionist |
| StartWaitTaskCTMachine | HCCM | ControlUnit | RadiologyControlUnit1 |
| StartWaitTaskCTMachine | HCCM | ControlPolicy | OnStartWaitForTaskCTMachine |
Then update the parameters in the Wait Activities that these control policies should be triggered in:
| Object | Tab | Keyword | Value |
|---|---|---|---|
| WaitForCheckIn | HCCM | StartTriggerList | StartWaitCheckIn |
| WaitForCheckIn | HCCM | StartTriggerChoice | 1 |
| WaitForScan | HCCM | StartTriggerList | StartWaitScan |
| WaitForScan | HCCM | StartTriggerChoice | 1 |
| WaitForTaskReceptionist | HCCM | StartTriggerList | StartWaitTaskReceptionist |
| WaitForTaskReceptionist | HCCM | StartTriggerChoice | 1 |
| WaitForTaskCTMachine | HCCM | StartTriggerList | StartWaitTaskCTMachine |
| WaitForTaskCTMachine | HCCM | StartTriggerChoice | 1 |
Now if you save and run your simulation you should be able to see patients arriving, checking in, being scanned, and leaving. If you get an error saying that a method cannot be found on the control unit, first make sure that all of the ControlPolicy inputs exactly match the names of the methods in the control unit java file. Then try closing Jaamsim, cleaning your project, and restarting Jaamsim.
7.4 Model Output
To perform different experiments and multiple replications we make use of Jaamsim’s MultipleRuns feature which can be found in the Simulation object at the top of the Object Selector window. Here we can use the NumberOfReplications to control how many replications are performed. We want to do 50 replications so we set NumberOfReplications to 50. We want each replication to run for one week, so we set RunDuration to 7d. To record outputs we can make use of the Simulation object’s RunOutputList, which saves the final value of outputs at the end of each run. The scenario number, and the replication number are saved by default (by default PrintRunLabels and PrintReplications are TRUE), but we will calculate confidence intervals ourselves so we set PrintConfidenceIntervals to FALSE. Because ActiveEntities are removed from the simulation when they enter a LeaveEvent, we cannot get the total time that each patient spends in the clinic at the end of the run. This is why we created a Statistics object called TimeInSystem that records how long they have been in the system before they are destroyed. We can use the SampleAverage output of the TimeInSystem object in the Simulation’s RunOutputList to output the mean time in system for each replication. Note The SampleAverage is divided by 1[h] to give a raw number in hours for later processing in Python. Otherwise JaamSim writes an h to the data file.
| Object | Tab | Keyword | Value |
|---|---|---|---|
| Simulation | Key Inputs | RunDuration | 7 d |
| Simulation | Key Inputs | RunOutputList | {‘[TimeInSystem].SampleAverage / 1[h]’} |
| Simulation | Multiple Runs | NumberOfReplications | 50 |
| Simulation | Multiple Runs | PrintConfidenceIntervals | FALSE |
Now if you save and run your simulation a file should be created called ‘yourSimulationName.dat’. To speed up running the simulation you can turn off the option ‘Real time’, in the top left corner next to the play button.
With the model complete and the results recorded we can use Python to analyse them. First download the Python analysis file provided (on Canvas in the Lab 5: Radiology Clinic Assignment), then change name of the .dat file to match yours and make sure it is in the same directory as the Python file, then run the Python file. The following output should be printed:
7.5 Task
Construct a 95% confidence interval for the average utilisation of the three CT machines in each experiment. You will need to add an entry to the RunOutputList. You should get the following output:
Mean             0.730582
CI Half Width    0.006098
Name: Utilisation, dtype: float64
Hint: there are many ways to do this. Have a look at the outputs provided on the wait activity WaitForTaskCTMachine, can you calculate the total time that the three CTMachines have spent waiting using these outputs?
Once your simulation is working and you are getting the correct results, you can get your lab signed off.